


Cinco de Mayo Celebration...
Reserve the Date: Friday, May 6th
for our first ever Cinco de Mayo Community Party. Instead of the
usual Appetizers and BYOB on the first Friday of each month, the first
Friday in May will herald in Spring with gusto! A Mexican buffet
($5) and Margaritas ($2) will be featured along with a Mariachi sound
track in the background.
Don't miss out on the festivities. Join your QE neighbors in welcoming Spring.
Bring your own Beverage or buy Margaritas.
Got a news story for The Ledger? Send us an email at MikeZets@gmail.com |
| Editorial Staff Contact Information | |
|---|---|
| The Ledger Newsletter Editor - Mike Zets | 412 670-7646 |
| The Ledger Newsletter Graphics Design - Sandi Zets | 440 452-5116 |
| Quarry's Edge Board of Directors |
|
|---|---|
| President: | Sid Tregillis 8347 Fossil 419 704-3482 srtregillis@gmail.com |
| Associate Vice President: | Karen McClellan 6025 Quarry's Edge 419 824-9698 klmcc12@yahoo.com |
| Treasurer: | Dick Duvick 8355 Fossil 419 885-2092 duvick.1@bex.com |
| Secretary: | Renee Smith 8361 Ledgestone 419 885-4429 renee5951@bex.net |
| Members: | Carol Martin 8329 Ledgestone 567 455-6677 Richard Towns 8345 Ledgestone 419 517-3830 |
| Meetings - 3rd Tuesday @ 6 PM All Owners Welcome |
|
| Property Mgr: | Dave Brown 419 537-1090 Ext 15 |
| Maintenance: | Tom Moore 419 882-5123 |

| |
|
Events Calendar Meeting Notes Links of Interest Other News |
Gardening Tips SCAM Alert Recipes Restaurant Reviews |
Featured Resident Pet Parade Subscriptions & Submissions |

Friday ~ Apr 1 ~ 5:30 PM Monthly Residents' Social Hour * - BYOB - No Foolin'
As always, you're invited to join your fellow residents for a fun time in
our Clubhouse.
Tuesday ~ Apr 19 ~ 6:00 PM Monthly Board of Directors' Meeting - Owners Welcome
Friday ~ May 6 ~ 5:30 PM Cinco de Mayo Social Hour
Buffet ($5) - Bring your own Beverage or buy Margaritas ($2).
Tuesday ~ May 17 ~ 7:00 PM Annual Owners' Meeting & Election of Board Members
- ALL Owners should Attend.

Tuesday, February 16, 2016 - Our Board of Directors met at their regular monthly meeting.
Sid Trigillis presided and all members were present along with Mr. Dave Brown,
representing Seaway Asset Management. Here are topics of interest from that meeting... *
- Trash Removal Service... The topic of Trash Removal and Recycling was discussed at length.
Our current service is by Republic, who indicated that they may be willing to reduce the cost for pick-up and disposal
in lieu of our going to the City of Sylvania for this service. All Star Disposal expressed an interest
in providing the service at the same low price and included Recycling Service AND return of the containers
to the vicinity of your garage after pick-up. It was moved and seconded to leave Republic and begin using the
services of All Star Disposal. (ASD uses only one can for garbage and recyclables and sorts at their
facility. No separate Recycle Containers needed.)
- Future Stone Work... Several properties have deteriorating Stone near the ground line that
has been brought to the attention of the Board. Cutting off stone that is below grade in contact with
the soil/mulch will be done and in at least one case, crumbling mortar at the intersection of the foundation
block and the floor slab will be repaired using the high grade caulking rather than additional mortar which
will fail again, if used for the repair. If you have Stone or concrete repairs that need attention,
please bring them to the attention of Sid Tregillis.
- NO Mulch in 2016... It was decided that applying Bark Mulch to the Limited Common Areas (Flower
Beds) around each unit annually was excessive and was contributing to water intrusion into some units as well as
damage to exterior mortar and stone. Therefore, new Bark Mulch will only be applied every other year,
skipping 2016 and resuming again in the spring of 2017. The Board asks that if you have mulch piled
up against your exterior stone, you rake it away from the building so that it is BELOW the line of the stone.
Tuesday, March 15, 2016 - Our Board of Directors met again at their regular monthly meeting.
Sid Trigillis presided and all members except Carol Martin were present along with Mr. Dave Brown,
representing Seaway Asset Management. Here are topics of interest from that meeting... *
- Trash Removal Service... Dave Brown reported that the current contract with Republic
extends through the end of 2016 at which time it is subject to automatic renewal unless 60 days prior
written notice is given. We will negotiate a contract with All Star Disposal before serving notice to
Republic. If for some reason, ASD will not honor its offer as described at our last meeting, the Board will
continue with Republic as a fall back position. The Board anticipates a seamless transition from Republic to ASD
at the end of this year.
- Water Rate Increase... The City of Sylvania has announced an increase in the cost of
water supplied to it customers. The increase will be $1.39/thousand gallon used going from $6.70 to
$8.09 per thousand on water only, not sewage. This is a 20% increase. This charge applies to all
water used, including our lawn sprinkler system. The Board decided that this increase could be included
in our budget without causing any additional increase in the monthly HOA Fees.
 Pool Opening...
The Board approved the opening of our Swimming Pool for Memorial Day Weekend.
Dave Brown will contact the company which did the repairs last year and will arrange for them to
open the pool on or before Friday, May 27th to have it ready for the 3 day holiday weekend beginning May 28th.
Pool Opening...
The Board approved the opening of our Swimming Pool for Memorial Day Weekend.
Dave Brown will contact the company which did the repairs last year and will arrange for them to
open the pool on or before Friday, May 27th to have it ready for the 3 day holiday weekend beginning May 28th.- Annual Meeting... May 17, 2016 at 7:00 PM was set as the date for the next Annual Meeting. Owners are encouraged to attend. (Robert's Rules of Order will be observed.) There are TWO seats on the Board (Richard Townes' and Sid Trigilis') coming open in May. Nominations for these seats will be entertained and a vote will be taken. These positions are for the normal 3 year terms, ending in May 2019. A reminder letter will be sent to all owners before the end of April. Watch for it in your regular mail.
 Minor Problems... There have been several complaints by owners which the Board discussed
at length.
Minor Problems... There have been several complaints by owners which the Board discussed
at length.
Use of the Clubhouse & Pool by Unaccompanied Minors Our Owners handbook reminds all Owners
that Minors (17 & under) MUST be accompanied by an Adult Owner (or Renter) at all times when they are using the Pool OR
the Clubhouse. This includes the adult's responsibility to clean up and return the facility to the
same neat and orderly condition in which it should always be left. If you observe this, please notify Dave Brown.
Feeding Critters While you are free to feed Birds and other critters near your unit, several
complaints have been received at one or more residents have been leaving bread, crackers and such near the
mailboxes. This attracts unwanted vermin (including Canadian Geese) to the area as well as being a hazard
to pets being walked nearby. Please DO NOT leave food in the area around the mailboxes.
 Speed Limits The Board requested that we remind everyone that Speeding within the development
will NOT be tolerated or ignored. There are pedestrians walking in the streets and Children/Grandchildren
playing outdoors all the time. With longer days, we will have pedestrians walking, skateboarding,
roller blading and cycling at all times of day. Remember too, that visibility can be poor with sunrises
and sunsets causing blinding glare. Speed bumps were discussed as a last resort.
Speed Limits The Board requested that we remind everyone that Speeding within the development
will NOT be tolerated or ignored. There are pedestrians walking in the streets and Children/Grandchildren
playing outdoors all the time. With longer days, we will have pedestrians walking, skateboarding,
roller blading and cycling at all times of day. Remember too, that visibility can be poor with sunrises
and sunsets causing blinding glare. Speed bumps were discussed as a last resort.
* -- DISCLAIMER: Every effort has been made to be as accurate as possible in reporting events and writing this newsletter but it is the responsibility of the reader to verify all information before acting on anything of legal consequence.
Table of Contents


 Sylvania Twp. has instituted a free ALERT SYSTEM to send out text or email alerts to subscribing citizens
about Police & Fire Emergencies, Road Closures, Public Meetings, Scheduled Pickups,
and Other Information.
Sylvania Twp. has instituted a free ALERT SYSTEM to send out text or email alerts to subscribing citizens
about Police & Fire Emergencies, Road Closures, Public Meetings, Scheduled Pickups,
and Other Information.  The City of Sylvania has its own page in Wikipedia. Loaded with information on our History, Schools,
Parks, and Notable Residents.
The City of Sylvania has its own page in Wikipedia. Loaded with information on our History, Schools,
Parks, and Notable Residents.


 February 18, 2016 by Bridget Small
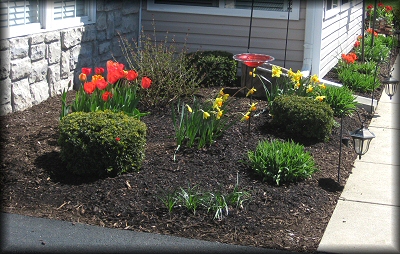
 One thing's for sure. Here at Quarry's Edge we all have sun AND shade to
deal with. In the front of your unit or in the rear; maybe even along the side; we have varying conditions.
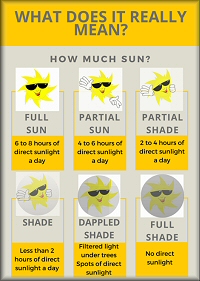
Plant labels will specify what level of sunshine the plant needs... Full Sun, Partial Sun, Partial Shade or Shade.
The fastest 'Road to Ruin' with a plant is to put it where it doesn't get what it needs. First of all,
remember that ALL plants need light to live. That's what photosynthesis is all about. Plants use sunlight
to grow. Some plants just need more or less sunlight than others but they all need it in the right amount.
One thing's for sure. Here at Quarry's Edge we all have sun AND shade to
deal with. In the front of your unit or in the rear; maybe even along the side; we have varying conditions.
Plant labels will specify what level of sunshine the plant needs... Full Sun, Partial Sun, Partial Shade or Shade.
The fastest 'Road to Ruin' with a plant is to put it where it doesn't get what it needs. First of all,
remember that ALL plants need light to live. That's what photosynthesis is all about. Plants use sunlight
to grow. Some plants just need more or less sunlight than others but they all need it in the right amount.


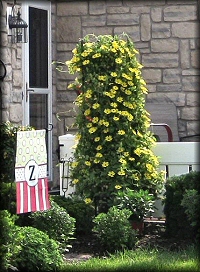
 Growing an attractive shade garden may at first appear challenging for some,
but finding the appropriate balance between two concepts will help guarantee success: Focus on foliage and
plant en mass. Look for shade plants that have colored foliage or interesting textures or leaf shapes.
Contrast the elliptical long leaf of a Hosta with the feathery leaf of a fern. Angular Bleeding Heart or
Astilbe leaves dance nicely above the rounded, larger and darker leaves of Lady’s Mantle.
Growing an attractive shade garden may at first appear challenging for some,
but finding the appropriate balance between two concepts will help guarantee success: Focus on foliage and
plant en mass. Look for shade plants that have colored foliage or interesting textures or leaf shapes.
Contrast the elliptical long leaf of a Hosta with the feathery leaf of a fern. Angular Bleeding Heart or
Astilbe leaves dance nicely above the rounded, larger and darker leaves of Lady’s Mantle.
 Most shade perennials bloom early in spring before the trees leaf out. So season-long color has to be
found in foliage. Using white in shade is popular as it stands out nicely because of the contrast.
A white centered Hosta pairs wonderfully with the taller feathery fern. In a shade garden, slices of
setting sun sometimes pierce the shade, lighting up a drift of ferns and making them shimmer like fireworks
in the breeze. More than one couple has been inspired to hold hands and take a walk down a hosta-lined
path. Hydrangeas make the perfect setting for sipping a favorite wine to the sound of friends' laughter.
Most shade perennials bloom early in spring before the trees leaf out. So season-long color has to be
found in foliage. Using white in shade is popular as it stands out nicely because of the contrast.
A white centered Hosta pairs wonderfully with the taller feathery fern. In a shade garden, slices of
setting sun sometimes pierce the shade, lighting up a drift of ferns and making them shimmer like fireworks
in the breeze. More than one couple has been inspired to hold hands and take a walk down a hosta-lined
path. Hydrangeas make the perfect setting for sipping a favorite wine to the sound of friends' laughter.
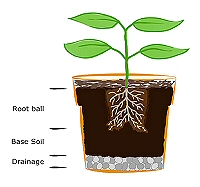 When you get them home, make sure to water them well and let them rest out of direct
sun for a bit to recover from the trip. Then, if you're going to put them in a Container or Larger Pot, put
some stones or sections of a broken clay pot over the drainage holes in the very bottom of the pot and loosely
fill the pot about 3/4 full with a high quality commercial potting soil. Make a cavity in the soil about
the size of the plant's pot, gently remove the plant from its shipping pot, spread apart the roots with your
fingers and place the plant in its new home. Scoot the potting soil around the root ball but do not overly
compress the roots or the soil near them. Cover the root ball with a THIN layer of soil and you're done.
One plant transferred to a new home.
When you get them home, make sure to water them well and let them rest out of direct
sun for a bit to recover from the trip. Then, if you're going to put them in a Container or Larger Pot, put
some stones or sections of a broken clay pot over the drainage holes in the very bottom of the pot and loosely
fill the pot about 3/4 full with a high quality commercial potting soil. Make a cavity in the soil about
the size of the plant's pot, gently remove the plant from its shipping pot, spread apart the roots with your
fingers and place the plant in its new home. Scoot the potting soil around the root ball but do not overly
compress the roots or the soil near them. Cover the root ball with a THIN layer of soil and you're done.
One plant transferred to a new home.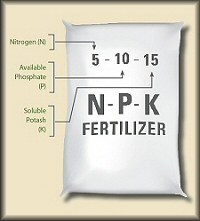 Fertilizers come in either granular or liquid form with varying amounts of different nutrients in an almost endless
array of combinations. If you pay attention to the labeling, you will find Three Numbers the tell you
everything you need to know about that particular fertilizer. Pay less attention to what the manufacturer
says their product does while making sure you read and understand those three numbers. They tell you exactly
what's inside the bag or bottle. The only other things you need to know from the label are what size area
will be covered and how to apply it. Here's what those numbers mean...
Fertilizers come in either granular or liquid form with varying amounts of different nutrients in an almost endless
array of combinations. If you pay attention to the labeling, you will find Three Numbers the tell you
everything you need to know about that particular fertilizer. Pay less attention to what the manufacturer
says their product does while making sure you read and understand those three numbers. They tell you exactly
what's inside the bag or bottle. The only other things you need to know from the label are what size area
will be covered and how to apply it. Here's what those numbers mean...

 Max faithfully served the University of Toledo as its Sports Information Director for almost 3 decades. He is a
native of Jackson Center, Ohio, and received his Bachelor of Arts degree from Capital University in 1950. He
spent the next seven years teaching at McKinley High School in Columbus, and the next three working on
the editorial staff of The Ohio State University. He came to the University of Toledo in August of 1960.
He redefined the position of UT Sports Information Director, setting standards and developing policies that are
followed to this day. He received the Spencer Award for Editorial Excellence for his work on the 1968
football programs, among many other national awards for excellence in public relations. He is recognized
nationally among the members of the College Sports Information Directors of America (CoSIDA) as an authority in
athletic public relations. During his tenure, Rocket teams won 24 Mid-American Conference (MAC) titles.
Max faithfully served the University of Toledo as its Sports Information Director for almost 3 decades. He is a
native of Jackson Center, Ohio, and received his Bachelor of Arts degree from Capital University in 1950. He
spent the next seven years teaching at McKinley High School in Columbus, and the next three working on
the editorial staff of The Ohio State University. He came to the University of Toledo in August of 1960.
He redefined the position of UT Sports Information Director, setting standards and developing policies that are
followed to this day. He received the Spencer Award for Editorial Excellence for his work on the 1968
football programs, among many other national awards for excellence in public relations. He is recognized
nationally among the members of the College Sports Information Directors of America (CoSIDA) as an authority in
athletic public relations. During his tenure, Rocket teams won 24 Mid-American Conference (MAC) titles.
 They were having a garage sale at all the campsites and he and
I were going around on his golf cart drinking beer when we came across Nikki for sale. She was really
struggling to get to me and I thought "this dog really likes me" (since then, I have come to realize she
does it to all humans, so I was not that special after all). So under the influence of alcohol, I put
a deposit on her. The next day, sober, I wondered what in the world I had done!! I can honestly
say I have never regretted it.
They were having a garage sale at all the campsites and he and
I were going around on his golf cart drinking beer when we came across Nikki for sale. She was really
struggling to get to me and I thought "this dog really likes me" (since then, I have come to realize she
does it to all humans, so I was not that special after all). So under the influence of alcohol, I put
a deposit on her. The next day, sober, I wondered what in the world I had done!! I can honestly
say I have never regretted it.